The Art of Setup Building, Part 1: The Baseline
I had a few projects in mind that I wanted to implement on my YouTube channel (well, one of the many versions of said channel), but considering my computer is effectively a potato with a bunch of wires with a monitor attached, that wasn't an option. So, I decided on this format, where I can be as through as I would like to be, in a format that's easier to create and edit. I know for a fact that video editing can take ages.
I have a few ideas planned regarding F1 Challenge '99-'02, one of the best F1 games ever made and effectively the grandfather of other sims such as rFactor and Automobilista, as well as Grand Prix World, an F1 manager masterpiece made by Microprose, of Grand Prix 4 fame.
The first project planned was me taking a stab at something that's been done again and again. The art, you could call it black magic, of making setups. This one in particular is focused on F1 Challenge '99-'02, hopefully a sort of spiritual successor to RacerAlex's Advanced Setup Guide which was made for F1 2002 and is still relevant even to this day. One of the positives of F1C is that its game engine, gMotor, has been modified many times for multiple other sims. It's probably the most versatile car racing engine ever made. This means that many of the tips here should work just fine on other sims. Naturally the meta on some might be different, specially the tire related setup, so keep that in mind.
This guide will be divided in quite a few parts, ordered in the way I go about with setup making. You don't have to follow the exact same order I do, but it is recommended to follow a certain pattern when making setups. Eventually you'll be able to go out of order and adjust the setup in any way you want, but for now make a standard to follow, results will come to you.
- The Baseline
- Your best friends: The tires, temperatures, pressures and alignments.
- He's got so much rear end: Weight Distribution, setup philosophy.
- Slow is fast: The brakes, power, cooling and reliability.
- A matter of balance: Wing angles and aero balance.
- Monster trucking kerbs: Ride heights, diffuser and rake.
- High downforce cars are weird: Suspension systems, corner springs, 3rd springs, dampers, packers and anti roll bars.
- Yo, free aero: Adjusting ride height, suspension and wings in the name of aerodynamics and balance.
- POWER!: Gear ratios, engine care and adjustments.
- Need for Diff. Speed: Differential, objective and adjustments.
- Did we do it?: Baseline v Custom setup, time and telemetry comparison.
- One lap magic: Qualifying adjustments.
- Challenging Ross Brawn: Race adjustments and strategy planning.
- Can you describe the conditions out there?: Wet weather adjustments
The test subject
We will start this series by electing a subject, the car we will be setting up as an example through this series. Our subject will be the 2001 Jaguar R2, as driven by Pedro De La Rosa.

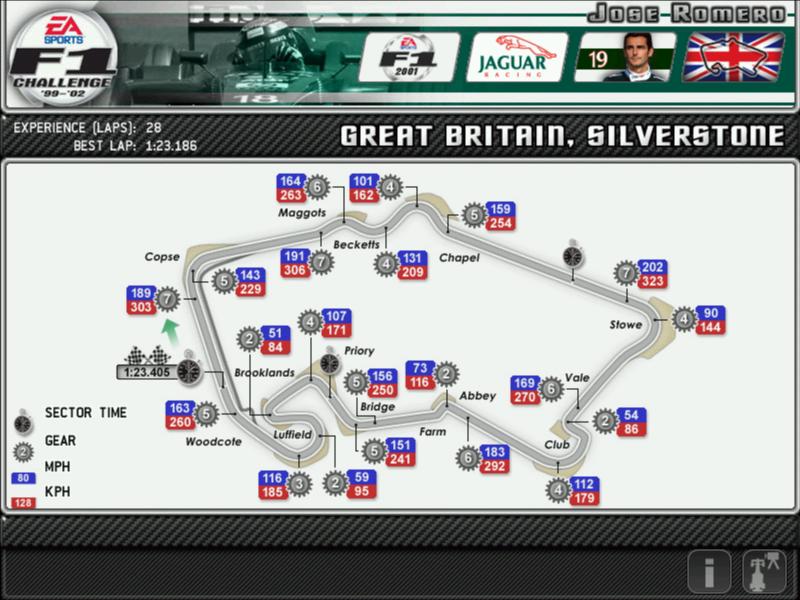
Our first testing venue needs to be one that's well rounded in as many aspects as possible. Barcelona is a possibility, but that one is a high downforce track. Instead, we will go to Silverstone, a mid downforce race track with a decent mix of corners and speeds.
I will be comparing myself against the AI set at 100%. I usually run 102%, but the AI is quicker than usual at this location. As for me, I'm a keyboard pleb, so I'm using some assists, namely Low Steering Assistance and High TC and ABS.
The Shakedown
The first thing we need to do is drive a few laps of the track and get used to it driving the base setup. A good part of the speed comes from you, the driver. A finely setup car helps a lot, but nothing beats learning the track and the lines you need to run. For that, you need to run a basic setup, don't touch it aside from altering fuel load and/or steering lock, and run laps until you feel comfortable with the car.
I did that, I loaded the base setup, lowered the steering lock to 12 degrees (anymore and the front tires will get destroyed), put 35 liters of fuel, and ran a few laps, just getting used to the track and car behavior. After making sure I could do a 10 lap stint with comfort, I ran a shorter stint that allowed me to set a fastest lap of 1:23.342 with a top speed of 298.2 KMH. That's very weak, considering teammate Eddie Irvine's fastest lap will be 1:22.272. We need to find a second over the next practice sessions, we won't be doing that right away, however.
Creating a baseline
OK, we got something to work with, we need to create a baseline setup that's designed according to our style. For that, we will use the basic setup options found on the setup menu.

The Basic Setup options will let you quickly rough in a setup based on 4 parameters. Most modded versions of the game will let you switch between the Notes Section and the Basic Setup Option using the button to the right. That said ... do you notice that it says "Custom" on all bars? That's because all circuit specific setups are modified without using the Basic Setup options. If you click on the middle of any of the bars ...

Now, there are 2 ways we can deal with this. Thanks to the Basic Setup options, we can quickly create a base for a decent enough setup for any kind of track we can find. I will demonstrate this even more when we go to different tracks.
First, we can base the car's setup around the expected top speed, or we can base the setup around the downforce level used in the standard setup. On this example, we will use method 1. The expected top speed around this track is around 323 KMH, as seen on the circuit profile image up there. Do keep in mind that is based on the best cars, the top end 2002 cars. We are on a mid level 2001 Jaguar, so realistically we can expect something like 310KMH for our top speed.

Here's the Gearing Bias slider moved all the way to the Speed side. In theory, we could reach well over 400 KMH ... if we had the power and space to get there. We don't. None of the cars in the base game do, to be honest. Not only that, but from a standing start, it will take us about ... 3 days and 6 hours to reach 200KMH ... in 2nd gear. The more top speed we have, the lower our acceleration is. I'll get into more detailed in the Gearing part. We won't be using the Speed side too much.

And here's the slider moved to the considerably more useful Acceleration side. It seems we'll barely reach 280 KMH at best, which is very Monaco-esque gearing. We will be moving the slider to this side plenty of times, though not to this extreme.

With the Gearing Bias setup like this, we should be able to reach around 310-320 KMH, assuming we have enough power to do so. We won't on this go, because the car has a lot of wing on right now. For now, let's test the car on this configuration.

We will be using F1C's telemetry tool plenty in this guide. The most useful of them is the Incremental Time Differential. I set the best lap on the base setup as the reference lap. The green line is the lap made with the baseline we are creating. Anything above the gray line is slower, below is faster.With a laptime of 1:23.422, we lost a tiny bit of pace. In addition to that, we aren't hitting the expected top speed. We don't even need 7th gear in this configuration. This is expected, as we still have some elements that we need to fine tune. Next up are the wings, using the Downforce Priority slider.

There are many, many options here, ignore them for now. We will get to them eventually. As you would expect, the Downforce Priority slider to increase or reduce the wing angle which will alter the amount of downforce and drag they generate.

Bias it to Grip, and the mechanics will bolt on as much downforce as possible, regardless of any other setting, This would be alright for Monaco or Hungary, but the drag penalty for carrying this much downforce would be extreme for Silverstone.

Bias to Speed removes all of the downforce, with the objective being to minimize drag. Now, even a full Speed setup would be excessive for Monza, let alone Silverstone. We need a pretty decent level of downforce, without compromising the top speed of the car.

This might take a few tests out on the track to finetune both Downforce and Gearing sliders before you are happy. Ideally, we want the red light to be active a bit before our braking point into Stowe, to maximise acceleration. More details on future parts. For the top speed we want to reach, I think this is just enough downforce. I ended up moving the Gearing Bias a tiny bit to the acceleration side to shorten the gears a bit. Eventually, we were reaching just about 310KMH, while the laptime dropped to 1:23.183.
Now, the setup itself is alreadu roughed in and it is ... fine. However, we can still adjust the car a bit to fit my style. The baseline setup right now is very stable, which I like, but it is TOO stable. I have to fight it to make it turn into some of the corners and while that might be fine for some, I feel that's taking some speed away from me, I'm not a fan of cars with heavy understeer. For that, we will mess with the Balance sliders.


Here's the slider moved all the way to the Oversteer side. The Balance slider will alter the wing angles, anti roll bars and brake bias to make the car behave the way you want it to. In this case, it made the rear ARB very stiff, the front very soft, added tons of front wing, dropped the rear wing to a very low setting. While I want a car that rotates, if I tried going on track with this setup, the car would try to spin on nearly any kind of input. Maybe a Kimi/Michael would like a setup like this, but for me this is excessive.


Here's the slider moved all the way to the Understeer side. It does the opposite of the Oversteer side naturally. Barely any front downforce, a stiff front ARB, a gigantic rear wing and a very soft rear ARB, as well as Cup/Stock Car levels of Brake Bias. Again, the car right now is borderline undrivable unless you are an Alonso/Hamilton type. While at low speed it would struggle turning in, at high speed it wouldn't turn at all. I don't rate that.


The last 2 slider a lot of the time we could agree on. They are based on the circuit characteristics. Here we will most likely not agree, because this slider is based on driving style. You might prefer Understeer. I don't. I added a tiny little bit of Oversteer. It balanced out the wings. It is more neutral now. While I think I could add more oversteer, I don't think it is necessary. I gave it a couple of runs, slightly tweaking the Gearing Bias and Downforce along the way. The extra Oversteer ended up lowering the downforce, so I added a bit more and tightened the gears.

Here's the Delta between the base setup. The Blue line is the time done after adjusting Downforce Priority, the Yellow line is the time done after adjusting and finetuning the Oversteer slider. Both better than the reference lap. I will admit that the Yellow line felt a lot better, but I made a few mistakes in Sector 3. While the stopwatch is the ultimate evaluator, if we are working on a race setup, driver comfort needs to be taken into account. I prefer this car now that it turns more.
Once again, we could leave this setup just as is. By this point, I consider it a solid enough setup to use as a baseline. However, there's one more slider we can adjust.

Once again, tons upon tons of settings here, we will deal with them in due time. The focus right now is the Ride slider, although I call it the Stiffness slider. This one will alter the corner spring rates, corner damping rates and anti roll bars. This is another driver preference slider. Naturally, this isn't the post to discuss whenever more stiff or more soft is better, but we can discuss what they do in simple terms.


Moving the slider to the stiff side will make the setup use beefier springs, dampers and anti roll bars. In simple terms, will respond very quickly to any kind of inputs. This can come from you, throught the steering wheel and pedals, or from the road, bumps and kerbs. This also makes the car stable at high speeds, due to many reasons that are out of the scope of this post. The sacrifice is overall grip. In simple terms, the car is responding quicker to inputs and the tires don't really like being loaded that quickly. Bumps and kerbs are also more likely to unsettle the car.


Moving the slider to the Soft side does exactly was says on the tin. The springs and dampers are at their minimal settings, the ARBs are on a low setting. The advantage of the softer suspension is overall grip, low speed stability and stability to road and driver inputs. Tires also prefer the softer suspension, as they now have to work at a slower rate. The disadvantage is that the car will lose performance at high speeds, and the car will take a longer time to respond. This time is very, very, very minimal on your typical corner, but when you need to make changes of direction, you will feel the car doing so slowly, something I can't afford when taking Maggots-Becketts.
I ended up using a slightly stiff setup, enough to make the car very responsive through Maggots-Becketts, but without compromising grip levels or stability over kerbs.

With a fastest lap of a 1:23.154, the setup feels much better through Sector 1. Indirectly, Sector 2 became much better. I still struggle in Sector 3, although that's mostly lack of talent. There's about 2-3 tenths lost on S3, at least in my opinion.
After FP1, I feel we have a setup that does, in general terms, what I want it to do. It can, however, do them much, much better.
The objective after the practice sessions is simple. The primary is just to beat Eddie Irvine, the secondary objective is beating the Saubers, who are slightly quicker than us. That's something acheivable. There's about 1 to 1.5 second still to find in this setup. We will be finding a good chunk of that laptime in FP2, as we start messing with Tire adjustments.


Comments
Post a Comment