The Art of Setup Building, Part 9: POWER!
The Power Unit: Engine Adjustments and Care
The setup, handling wise, is done. Everything there is perfect. But there are a few more adjustments we can do. We haven't touched the engine, gearing or the differential. We will deal with the power unit first.
We need Data: Peak Power, Optimal Temperatures, Safe Temps and RPMs
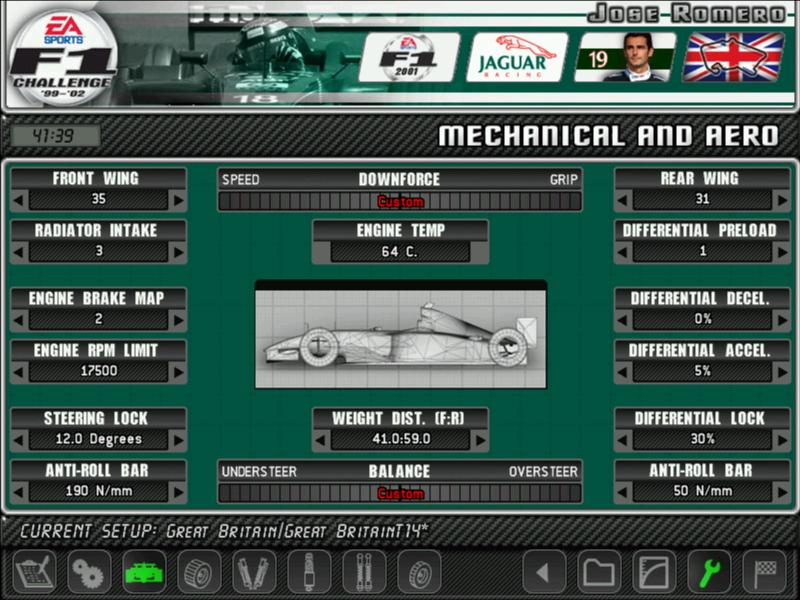
Before we start tuning the engine, we need to know some data to make this work correctly. For that, similar to when we tuned the brakes, we go to the SeasonData/Vehicle folder. We want to find our car's folder, and open the engine.ini file. We should be seeing something like this:

OK, the relevant lines here and their descriptions are:
- LaunchEfficiency: Will tell you if the car has a Launch Control System, and how effective it is.
- OptimumOilTemp: The Minimal Engine Oil Temperature at which the engine produces full power. It also manages the Thermostat, as I'll explain in a moment. °C is the unit.
- LifetimeEngineRPM: Defines the Engine RPM that will affect the Engine's Lifetime
- LifetimeOilTemp: Defines Engine Oil Temperature that will affect the Engine's Lifetime.
We have SOME data. The next one is optional, but it can definitely help to make a better decision: The Peak Power RPM.
For that, there are some editors. I use the rFactor Physics Editor 1.88 (There is a 1.89 version too), or Tom's Engine Shop.
We want to open the Engine file with the editor of choice. In my case, I opened with the Physics Editor and saw this:

What we care about here is Peak Power RPM. If we look at the graph, the red line (Power) peaks around 16.5k-17k RPM. Looking at the table on the right, the highest power number is at 17k RPM. We have values now. We can go to work.
Engine RPM Limit: Saving engine AND increasing power, all at once

F1 Engines of this time an age revved to absurd amounts. The highest revving engine in the game, the 2002 BMW engine supplied to Williams has a max RPM Limit of 19000 RPM. And you want to know the craziest thing about that?
You'll only use that many revs during a qualifying session. For a race session, you would use the MINIMUM RPM limit with that engine. Let me explain.
On the setup, we can adjust the Engine RPM Limit. This adjust at which RPM the engine will cut out, as well as when the shift lights on the steering wheel will turn on. While common sense would say Max Revs = Max Power, as we know from many other posts in the past, that's not how physics works..
Engines produce Torque, a rotational force. This force goes through the transmission, gets amplified by the Gearbox and Differential (The Final Drive) and then reaches the wheels. If we wanted to do things accurately, we would have to calculate Torque at the Wheels, which would take a while to do for every gear and RPM. Instead, we standardize values by using Power, which is Torque x Speed. While Torque produced by the engine and Torque at the Wheels will be different, Power will be equal on both ... well, "equal".
As you can see from the graph, both Torque (Yellow) and Power (Red) grow. At some point, Torque stops increasing, but Power keeps going. Even when Torque starts falling, Power keeps growing a bit. Eventually the heavy reduction in Torque starts dragging the Power down. So, if we have a high RPM Limit, we would enter this "losing power" area of the rev range, which would cost us time during accelerations. However, we can still take advantage of this area. We can head slightly into the "losing power" range so that, when we shift into the next gear we start with more power. And if we are smart, we could just use the extra RPM range to serve as extra top speed. That isn't the problem.
The problem is that, while F1 engines are designed fantastically, they can't escape physics. As they rotate faster, they start wearing themselves. This is negligible at low RPMs, but the higher you go in the range, the more this "mild wear" turns into "severely crippling damage". And if that wasn't enough, higher RPMs make the engine run hotter. We would basically be damaging the engine quicker, for less power. Bad trade off.
So, we want to run a high enough limiter,so that we can use the engine's peak power and a little bit, but also low enough that we don't go too deep and we lose too much power and increase wear too much.
There are two methods for setting the Engine RPM Limit. The first one uses the Peak Power RPM, the second one uses the Values on the LifetimeEngineRPM line. Both are simple formulas.
Method 1: The Power method
- Peak Power RPM + 500 RPM.
- In our case, it would be 17000+500 = 17500 RPM Limit
Method 2: The Wear method, based on the LifetimeEngineRPM
- 1st value + 2nd Value * 2, then round.
- In our case: 16760.6 + 378.3 * 2 = 16760.6 + 756.6 = 17517.2, rounded to 17500 RPM.
It is a coincidence that we had the same values here, but if I tried in the before mentioned 2002 BMW:
- Power = 18000 RPM (Minimal RPM is 18k)
- Wear = 18400 RPM
In my case, I was using the Power method. On the setup, I input the desired RPM Limit.

However, now we will run into an issue. The gears will be too short for the current limiter. You know what that means:
Summary
- The RPM Limit is simple, it is designed to prevent you from overreving and blowing up the engine. However, that doesn't stop you from setting it high, lose power and wear the engine quicker.
- A higher RPM Limit will allow you to use more of the rev range. Performance wise, this isn't always a good thing, so check your engine's power curve. It will allow you to wear the engine more, that's for sure.
- A lower RPM Limit will reduce the rev range available to you. Not always bad in terms off performance. It will reduce the damage sustained by the engine.
- Be advised that this only works during normal work. The engine will shoot well past the limiter if you are too aggressive on your downshifts.
- Changes on the limiter will also be reflected on the On Screen Display, as well as the car's Steering Wheel. The RPM Lights will light up earlier or later depending on the RPM Limit.
- If in doubt, the middle setting usually works fine, though it won't be optimal.
Gear Ratios: Acceleration v Top Speed
Gearing is not too complicated to be honest. Our cars are equipped with semi automatic sequential gearboxes. In english, they will go through the gears one by one (You can't skip gears, though you can go to neutral instantly), and they'll handle all of the difficult things, like blipping, lifting and using the clutch when changing gears. Depending on your team's engine supplier (AKA what the developers and modders decide), you'll have a set amount of forward gears and a reverse gear.
Each of these gears has a ratio, which multiplies the engine torque, but will reduce the rotation speed. This is why you can't reach so much top speed in 1st gear, and why the car accelerates slower in 5th or 6th (Among other things). There's also the Final Gear Ratio, AKA the Differential Ratio, which serves as a constant multiplier for all gears.
If you used the method outlined in "The Baseline", you should be very close to an ideal setting, even with the smaller RPM Limit. Even if you didn't, there's really not a lot to do in terms of the gearing. We need to optimize three things, the Top Gear, the Starting Gear and the First Racing Gear.. For that, we will want to define the Final Gear Ratios first.
Final Gear Ratios and 1st Gear: What are you prioritizing?
Depending on the mod, you'll have a certain selection of gear ratios. In the base game, we have three of them, all of them useful in one way or another. A short final gear ratio will increase torque, which means acceleration will be more powerful for the same set of gears. The sacrifice is that the speed of the wheel will be slower, which means your top speed is lower. To reach the same top speed as before, you'd have to extend the gears. A long final gear ratio does the opposite, it will allow the wheels to rotate faster (more top speed) but will reduce overall torque (less acceleration).
Now, there are a few ways to use the final gear ratios. You could use them depending on the track (short final for slow tracks, long final for fast tracks), you can use the shortest that gives you the top speed you want (which means ignoring the long final and using the short nearly everywhere). My method is focused on using the final gear that will improve the aspect I consider the most important. Let me explain.
- If I want to prioritize my race start, I will use the short final, the shortest 1st gear that will get me a good launch, and use 2nd gear as my First Racing Gear. I won't touch 1st gear anymore.
- If I want to use 1st gear to get a good exit out of corners, I will use the medium final, combined with the shortest 1st gear that will get me out of the slowest corner without too much trouble.
- If my priority is to maximize power on the medium and high speed sections, I will use the long final gear, and the shortest 1st gear I can use. Now the upper gears will be grouped tightly and minimal loss of power will occur at high speeds.
This area is open to experimentation, but don't expect to get half a sec off of tweaking the gears. Expect a tenth or so.
Top Gear: On your own v On a tow
Whatever method you use in terms of final gear ratio and 1st gear selection, they aren't as important setting the correct top gear for the job. Tweaking the top gear is fairly simple. Ideally, you want to hit the engine's Peak Power RPM at the end of the straights. Now, that's a it difficult to hit, so instead we'll focus on something achievable. You want to have the Red RPM Light turn on about a bit before your braking point at the fastest point of the track. Just a bit before. Too early, and you'll be on the limiter. Too late, and you'll lose some potential top speed. The game manual recommends about 300m before the brake point. I'd just make sure I can see the Red RPM Light turn on for a while.
However, if we just set the top gear like that, we cripple our ability get into a slipstream and increase our top speed. A tow is useless if you are banging on the limiter. This was a problem before F1's fixed ratios era. The reason is that you'd rather get max performance on your own, because tows are not as common as you'd think. I agree with this. However, you might not. You think that having extra space would be better to take advantage of the draft. That's all right. That leaves you with two options: Either you extend the top gear (compromising acceleration a bit) or you increase the limiter (compromising engine reliability a bit). Your call.
As for the middle gears, this depends. If you are running a semi automatic car like his one, with shifting as quick as it is, just space them so that the graph angles up evenly, similar to the one in the image. If you are using a car with a true manual gearbox, stick shift and all, you might have to extend 1 or more gears. You don't want to be thinking "The low gear or the high gear?" as you are dealing with corners. Pick one, the one that means you have to shift less.
Summary
- The gear ratios will define the top speed of the car, as well as its acceleration. This is both in general and on a gear to gear basis.
- The Final Gear Ratio is a multiplier to all gears. A short Final is biased to acceleration, a long Final is biased to top speed.
- The Individual Gear Ratios allow you to fine tune each gear. The same Final gear rules apply here.
- Really, only 1st, 2nd and top gear are of utmost priority. The others usually fall into place.
Engine Temperatures: What are we aiming for?
Before we tackle the question of how much cooling the needs, we need to know what kind of temperature is bad and what's good. We can easily use the Temperature data from the engine to determine that. There are 5 important temperature points. (Note: the game uses Oil and Water temperature. From now on, whenever I say Engine temperature, I'm referring to the Oil temperature. Water temp will be referred to as such)
- Thermostat Temp: OptimumOilTemp - 10
- Optimal Temp: OptimumOilTemp
- Max Safe Temp: OptimumOilTemp + (LifetimeOilTemp - OptimumOilTemp)/3
- Overheating Temp: LifetimeOilTemp
- Max Temp: LifetimeOilTemp 1st Value + LifetimeOilTemp 2nd Value
I'll explain what these values mean in a moment, but first let's see an example, using the same values I posted on all the way up there. I'll save you the trouble of going back up.
OptimumOilTemp=107.0LifetimeOilTemp=(124.89,2.93)
All right, here we go:
- Thermostat Temp: 107 - 10 = 97.0 ºC
- Optimal Temp: 107ºC
- Max Safe Temp: 107 + (124.89 - 2.93)/3 = 107 + (17.89)/3 = 107 + (17.89)/3 = 107 + 5.96 = 112.96ºC
- Overheating Temp: 124.89ºC
- Max Temp: 124.89 + 2.93 = 127.82ºC
- Starter Phase: Occurs right after the engine is started. The Engine is at a low temperature. The Cooling Water is at ambient temperature.
- Underheated Phase: Occurs when the Engine Temperature reaches the Thermostat Temp. The Cooling System will engage. The Engine will start transferring heat to the Water, and the Water will start heating up while the Engine Temp will remain stable. If an engine remains on this phase during a stint, it is safe to say the cooling is excessive and you are not saving the engine.
- Optimal Phase: Occurs when the Water is sufficiently hot and the Engine Temperature starts increasing again. At this point, the cooling system is working at its best, dissipating as much heat as it can from the engine. At the same time, the engine will be closing to the Optimal Temperature, or might even exceed it (Ideal Scenario). At some point, the engine will stabilize in this phase, between the Optimal and Max Safe Temps. This is the objective.
- Overheated Phase: If the cooling is too limited, the Engine Temp will shoot past the Max Safe. It isn't a reason to panic ... at least right away, eventually you'll get closer and closer to the LifetimeOilTemp. The closer you are, the quicker the engine will wear. If you even dare to consider running in this phase, make damned sure to keep below the Overheating Temp.
- Qualifying Phase: There's an exception to the previous rules. During qualifying, you can lower cooling a lot and gain some time. However, if you do this, you want to keep the Engine Temp under the Max Temp. You should be fine running between the Overheating and Max Temps. However, if you are running a 50% Race or lower with Time Adjusted Mechanical issues, keep the engine on the Overheated Phase.
- Danger Phase: Never, ever go over the Max Temp. There's no point, even in qualifying, You should never be here unless Mechanical Failures aren't a factor.
To simplify, we want to be at the Optimal Phase, ideally between the Optimal and Max Safe Temps. We have a target, let's get to adjusting.
Radiator Cooling: Stop giving away performance
Just like with the Brake Ducts, we have access to multiple sizes of Radiator Openings. Mod dependant, most will have 5. Just like with the Brake Ducts, bigger Radiators will increase the car's drag, and lower the downforce it produces. The trick is to use the smallest Radiator that gets you into the Optimal Phase.
And we are back to the setup. When I was doing the previous tests, I was keeping an eye out on the Engine Temp. Engine was totally stuck on the Underheated phase by a lot, so I dropped the radiator to 3. Then gave it a few runs. Now, if you are following this, you've seen the Brakes chapter and know how to turn on the Temps MFD Screen. We'll be using that today. Focus on the Oil temp.


OK. We now have an engine that's properly cooled and working efficiently. Again, I must remember you that you can run too much cooling, so much that the Engine stays Underheated, and you aren't saving the engine that way. There's another setting we can alter. While it doesn't alter pace that much, it is a good comfort setting.
Summary
- The Radiator Intake controls how much cooling the engine has. This is an important setting for the engine reliability and power.
- Higher Radiator Intake settings increase the cooling of the engine. This also increase drag, reduces downforce and, depending on the engine temp before, might underheat the engine, which loses power.
- Lower Radiator Intake settings reduce the cooling of the engine. This lowers drag, increases downforce. It can increase engine power if the engine was underheated, but it can to compromised engine if it is excessively low.
- It is a horrible idea to overheat the engine, because it would explode. It is a bad idea to underheat it, as you might be losing performance without gaining reliability.
- Engine temps can change drastically with ambient temps. A setup build at 30ºC Ambient will overheat at 35ºC and underheat at 25ºC. Keep an eye on those temps.
- If in doubt, settings 3 and 4 are generally the best. 5 should be reserved for extremely hot days, 2 for extremely cool days and qualifying sessions. 1 is a qualifying setting only.
Engine Brake Map: Controlled Entry v Maximum Braking
The final engine setting we hhave to our disposal is the Brake Mapping. Let me put that image again.
That blue line I haven't mentioned is the engine's braking torque. When off throttle, the engine will still output torque, just in the reverse direction. This will slow down the driving wheels, which offer an extra deceleration force. However, this torque can be excessive, strong enough to lock the rear tires and generally be difficult to control.
To respond to that, we can apply a bit of throttle while decelerating. This reduces the braking torque and stabilizes the rear wheels. This is a technique applied by many under deceleration to add stability. We could do this ourselves, or we could allow the Engine's ECU to deal with that, applying throttle automatically to reduce brakig torque. That's what Engine Brake Map does. As usual, this is a mod dependent setting.
The theory is simple, the ECU will apply a certain amount of throttle based on the RPMs and the Brake Map setting. If we increase the Engine Brake Map setting, the ECU will use more throttle, helping stabilize the car but potentially reducing braking performance. It also reduces fuel efficiency a bit. Lower Engine Brake Map settings reduce the applied throttle, increasing braking torque, but potentially allowing the rears to lock up. This also increases fuel efficiency, but not significantly.
Generally, this is a driver comfort setting. I rarely vary it much. My usual setting is the highest possible, 5, as I have as much control on corner entry as I want. This is very important in hard braking zones. However, if I know I have total control over the car, or need a performance edge (like in qualifying), I will dump this to 0 and live with the rear being a bit jumpy.
Do be aware that engine braking only applies when the transmission is engaged, it does nothing during the few moments a shift takes to occur.
Warning: This parameter isn't saved on the setup. You have to manually input it again every time you load the setup.
Summary
- The Engine Brake Map controls how much Engine Braking is allowed. Useful for fine tuning braking and corner entry balance.
- Higher settings decrease the engine braking, which reduces rear wheel underrotation and lock ups. This also reduces deceleration and could slightly reduce fuel efficiency.
- Lower settings increase the engine braking, allowing to slow down the car quicker, but the cost is an increase in rear wheel lockups. It will slightly improve fuel efficiency.
- If in doubt, use the highest setting, as that gives out max stability without too much performance loss.
Engine Care
I will close up this post talking about how to protect the engine. It doesn't matter if we carefully set the RPM Limit and Cooling if your habits are bad to the engine. If you want to take care of it, then listen ... ehm, read:
- Aggressive downshifting is the main suspect of blown engines: For as cool as the sound the engine makes is as you start shifting downwards as you brake, it isn't good if you plan to use it long term. The main Do Nots are: DO NOT shift down as you start braking (common) and DO NOT shift down BEFORE you start braking (bizarrely common and downright silly). Ideally, you brake, let the brakes and engine braking (remember, engine braking doesn't work during a downshift) do some work, then start downshifting. This is because ...
- High RPMs are the primary reason for engine damage: This is why we are using a Rev Limiter. Too many revs will kill the engine quicker than anything else. For this reason, you should not stay on high revs for a long time. The only reason to be that high is if the peak power is there and you are about to shift, or if you just downshifted and overshot the ROM Limit. You shouldn't be here voluntarily too often. Whenever the critical moments of the race are over, short shifting becomes the name of the game.
- Engine Temperature is a factor too: Over this factor we usually have less control while out on the track, so the setup needs to be on point. We want the engine to be on the optimal temperature and not much more. Too high and the engine wears quicker. Too low and it's GP2 Engine hours. If the temps, for some reason, start getting uncomfortably high, short shifting plus lift and coast should keep them under control.
https://ko-fi.com/jose21crisis


Comments
Post a Comment