The Art of Setup Building, Part 8: Yo, Free aero
Adjusting ride height, suspension and wings in the name of aerodynamics and balance.
The objective of the last post was simple: Make you understand the assignment, letting you know the task at hand. To simplify, and in order of implementation:
- We want the ride height at their ideal points, the front as low as possible, the rear at the ideal on the fastest corners of the track and as low as the front down the straights.
- We want to use the suspension system to control the ride heights and adjust car behavior to our likening.
- With the ride height low and diffuser working like it should, we trim the wings for minimal drag.
That's the mission. We adjust ride heights, control them with the suspension, then adjust wings. Understood? Good. Let's go.
Adjusting and controlling ride height.
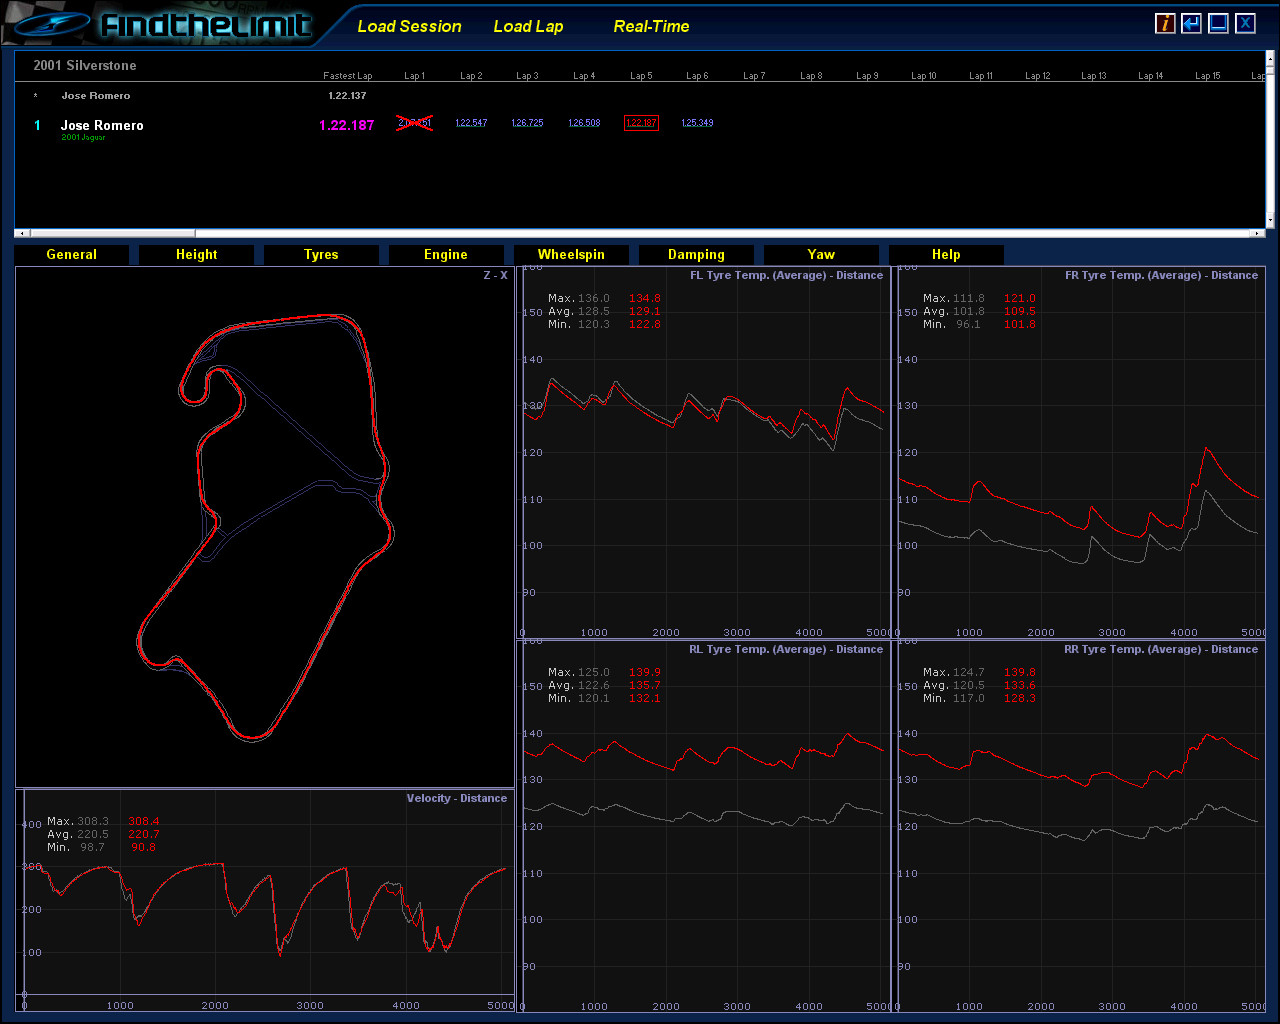
We haven't had a lap time comparison for a while. Current personal best is a 1:22.137. I didn't put a reasonable lap time after adjusting the brakes, though, way back at the end of FP1. I'll keep an eye out on the temps as we go.
Note: My PC was all dusty inside and was lagging a bit. I feel I could have done better, and would have adjusted the setup differently with the PC working all right.
First order of business is adjusting the dampers. I adjusted them using the Soft preset I outlined in the previous post. Next is lowering the ride heights. I gave a recommended setup of ride heights, so let's use them.

I did a few laps to get a representative lap time. However, a few corners in and I noticed a big issue ... the rear end was SUPER loose. The car would rotate way too much. Someone might like it, yes, but it was aggressive. Way too aggressive. The issue was the rear packers being at the base setting.

Lap time was close, and Sector 2 looked good, but I struggled through 3 and S1 was not impressive.
Let's take a look now at the ride heights in the two places I deem important. The end of the Hangar Straight and T1, Copse.


So what we learned from that lap, is that the packers can be used to adjust the handling. Remember, they stiffen up the suspension as they are compressed. I'd rather lower the car, so let's remove them.
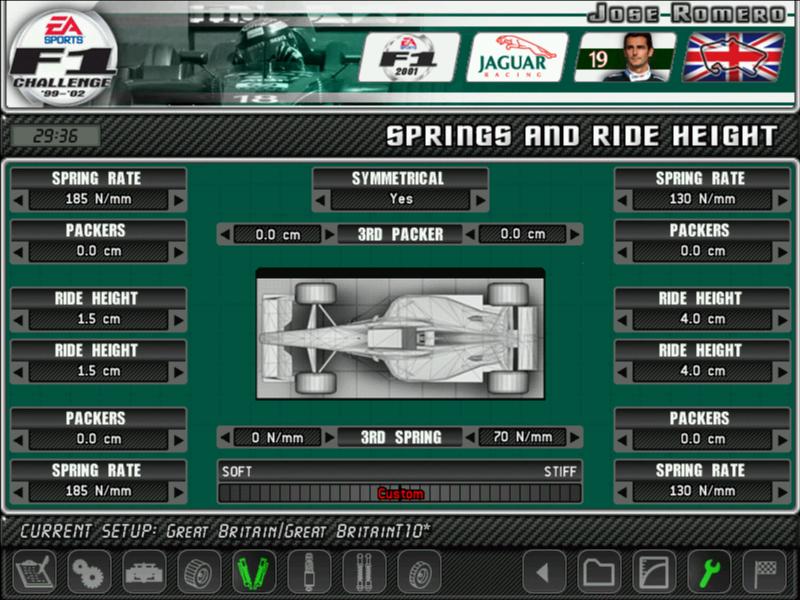
Along the way, I also removed the front packer, and raised the rear ride height to 40mm. The objective is to lower the front ride height and keep the rear at the ideal point at Copse. It should be noted, I gave it a few runs before I came up with this. Fortunately, those runs were single lap runs.


Car feels very good. Stable, turns good. It is a bit sus over kerbs, but I can always avoid. Next step is to fine tune the handling itself. We have spring and ARB adjustments to do.
Getting the handling right
This one also requiered some testing, a few laps before I was comfortable. I ended up with this for Springs, Bars and Wings.


That's the end of FP3. There are some minimal adjustments that I'll do during FP4, but they are minor. The focus of FP4 will be getting the engine, gearing and cooling in the ideal range.
Time Summary
- Starting Lap Time: 1:23.342
- Laptime after FP2: 1:22.137 (-1.205) (We fast, boi!)
- Laptime after tire adjustments: 1:21.688 (-1.654)
- Expected Lap Time: 1:22.272 (+1.070 compared to start, -0.135 compared to finish)
Finally, I gave the AI qualifying setups. Eddie Irvine would set a fastest lap of 1:21.308. On Qualifying trim and pace. We are just 3 tenths off of that. I think that's G O O D.
For summary of why I did what, and why I adjusted the parts the way I did, look at their respective Summaries in their respective posts. Feel free to ask if you are confused.
Like this content? Want to do something entirely optional and support it? Go right here, on this link:
https://ko-fi.com/jose21crisis


Comments
Post a Comment